Technical Comparison
Broaching vs. Milling: Which is Cost-Effective?
Comparison of cycle times, precision tolerances, and cost-per-part between broaching machines and CNC milling for mass production.
Read Full ArticleExpert engineering guides, troubleshooting tips, and industry insights for broaching professionals.
Comparison of cycle times, precision tolerances, and cost-per-part between broaching machines and CNC milling for mass production.
Read Full Article
Don't wait for tool breakage. Learn the 5 critical signs of a dull tool and how proper sharpening extends tool life by 300%.
Read Full Article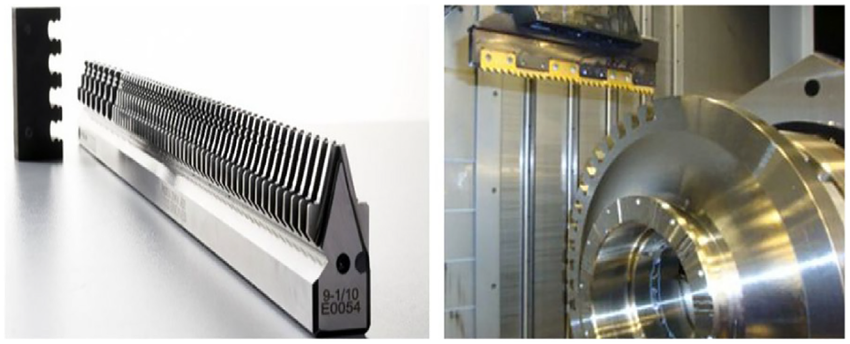
From CAD drawing to final production: How we calculate chip load, gullet depth, and rake angles for special form broaches.
Read Full Article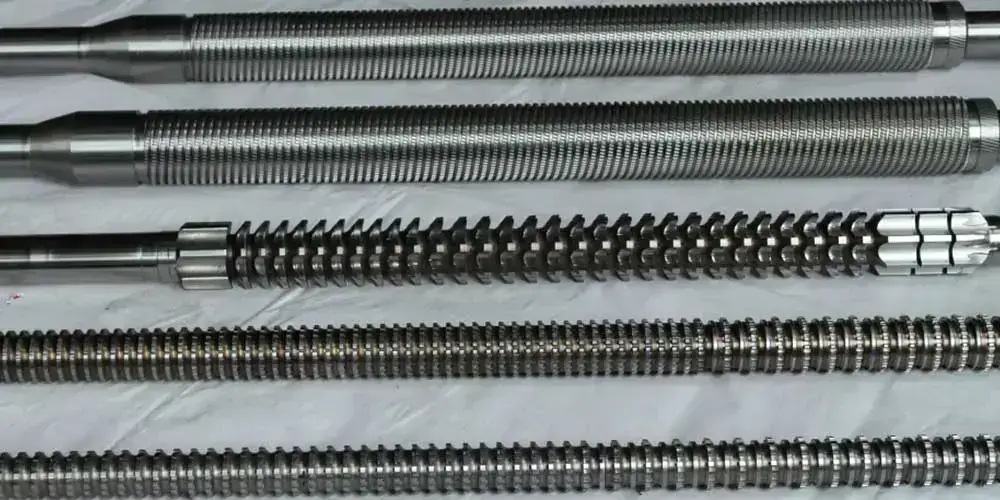
What is the difference between TiN (Gold) and TiAlN (Violet)? Which coating is best for stainless steel broaching?
Read Full Article
Is your workpiece tearing, chattering, or showing rings? Check your alignment, coolant type, and broach design immediately.
Read Full Article
Understanding the fundamental differences between "Pot Broaching", "Keyway Broaching" and Surface applications.
Read Full Article
Neat Oil vs. Water-Soluble? The wrong coolant can cause galling. A guide to EP additives and viscosity selection.
Read Full Article
Drift, Chatter, Tearing, and Galling. We explain exactly why these defects happen and how to fix them permanently.
Read Full Article
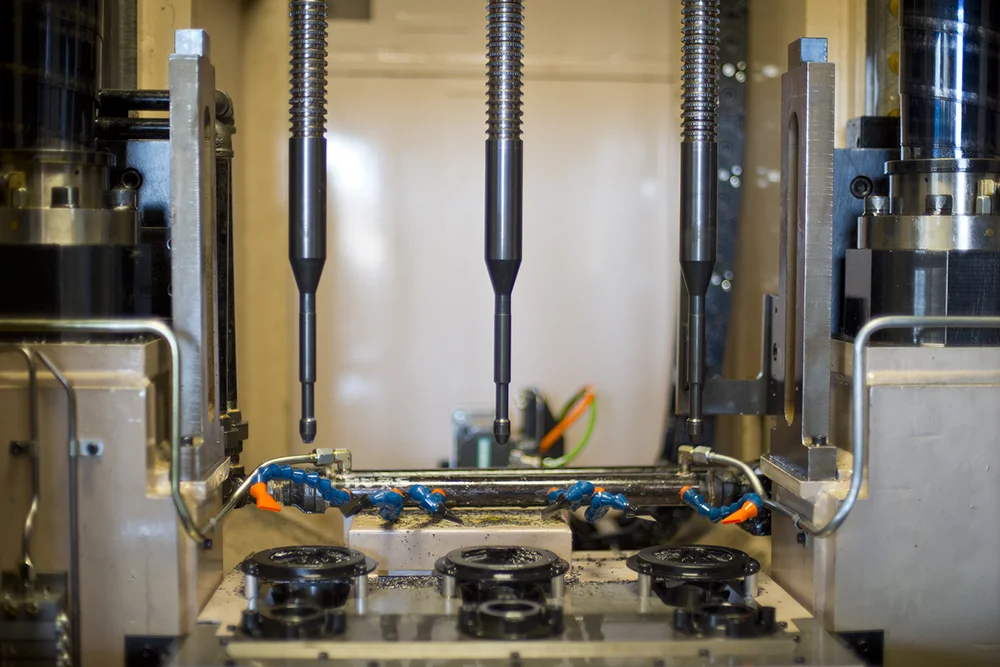
When manufacturing internal profiles such as splines, keyways, hexes, or squares, engineers often face a critical decision: Broaching Machine or CNC Milling Machine (or Wire EDM)? While milling offers great flexibility for prototyping and low-volume jobs, broaching is the undisputed king of speed and consistency for mass production. In this comprehensive guide, we analyze the technical differences, cycle times, and cost implications of both methods.
Broaching is a "one-pass" machining process. The tool (broach), which has a series of progressively larger teeth, passes through the workpiece once, and the profile is completely finished. It is a form of planing or shaping but much more efficient.
Milling (or Wire EDM) generates the profile by moving a small cutting tool along a path. This requires multiple passes, complex axis interpolation, and significantly more time.
Let's compare the production of a standard 10mm keyway in a steel gear:
| Feature | Broaching | CNC Milling | Wire EDM |
|---|---|---|---|
| Cycle Time | 5 - 15 Seconds | 2 - 5 Minutes | 15 - 30 Minutes |
| Setup Time | Moderate (Fixture change) | Fast (Standard vise) | Slow |
| Throughput (8 Hours) | ~2000 Parts | ~150 Parts | ~20 Parts |
The Result: For an order of 10,000 parts, broaching can save hundreds of machine hours. This translates directly to profit.
In broaching, the precision is built directly into the tool. If the broach tool is ground to a tolerance of H7, every single part produced with that tool will be H7 (until the tool wears out). There is no complex interpolation or axis movement involved, minimizing machine error.
In milling, the accuracy depends on the machine's rigidity, the tool deflection (which is high in deep holes), and the servo motor's precision. Maintaining consistent tolerance over thousands of parts requires constant monitoring and compensation.
If you are manufacturing gears, automotive shafts, or hydraulic components in high volumes, broaching is the most efficient solution. At Broach Tool Industry, we design and manufacture high-precision broaches that can produce thousands of parts with a single sharpening.
Broaching tools are precision instruments manufactured from expensive high-speed steels (HSS or PM-HSS). Replacing a tool prematurely wastes money, but using a dull tool can destroy your workpieces and even damage your machine (e.g., ram cylinder failure). So, identifying the exact moment for sharpening is crucial for profitability.
The most reliable way to check a broach is to look at the cutting edges under a magnifying glass (10x Loupe). As the tool cuts, the sharp corner of the tooth wears down, creating a flat area called the "wear land."
Pro Tip: Waiting too long requires grinding off too much material (0.5mm+) to restore the edge, which significantly reduces the total lifespan of the broach (number of sharpenings per tool).
A sharp broach cuts cleanly, leaving a smooth, shiny surface (often Ra 0.8 - 1.6). As the tool gets dull, it starts to "plow" or "tear" the metal rather than shearing it. Signs to watch for:
Dull tools require significantly more force to cut metal. If your broaching machine has a load meter or manometer, monitor it closely.
If the standard pulling force for a specific part is 5 Tons, and you notice it creeping up to 6 or 6.5 Tons (a 20% increase), the tool is dull. Continuing to run puts excessive stress on the machine's pull head and hydraulic system, leading to potential tool breakage (snapping).
At Broach Tool Industry, we use specialized CNC sharpening machines. We do not grind the top diameter (OD) as this would undersize the tool. Instead, we grind only the face (rake angle) of the teeth. This maintains the original profile and diameter tolerance while restoring a razor-sharp edge. Regular sharpening can extend your tool's life by 5 to 10 times.
While standard keyway and spline broaches (DIN 6885, DIN 5480) cover many applications, modern manufacturing often requires special geometries. Whether it's a "Double-D" shape, a Christmas-tree turbine root, or a complex helical spline, off-the-shelf tools won't work. Here is how we engineer custom solutions at Broach Tool Industry.
The process starts with your workpiece drawing. We need to know three critical factors:
Our engineers use specialized software to calculate the "Rise per Tooth" (Chip Load). This is the amount of material each tooth removes.
| Broach Type | Typical Rise per Tooth |
|---|---|
| Round / Bore | 0.01 - 0.04 mm |
| Spline / Hex | 0.03 - 0.06 mm |
| Keyway | 0.04 - 0.08 mm |
We use premium European steel (Böhler/Erasteel). The soft steel is turned and milled to near-net shape, then heat-treated in vacuum furnaces to reach 64-66 HRC hardness. Finally, the profile is ground on high-precision CNC spline grinding machines to micron-level accuracy.
To further enhance performance, we apply PVD coatings like TiN (Titanium Nitride) or TiAlN. This reduces friction and protects the cutting edge from heat, increasing tool life by up to 300%.
In modern machining, an uncoated tool is a missed opportunity. PVD (Physical Vapor Deposition) coatings are not just for aesthetics; they act as a heat shield and a solid lubricant for your tool. Here is the technical breakdown of the coatings we offer:
This is the general-purpose industry standard.
This is a high-performance coating for difficult materials.
Used for extreme wear resistance and dry machining. It offers excellent thermal stability and is often used in high-speed hobbing and broaching of hardened materials.
A properly coated tool can last 3 to 5 times longer than an uncoated HSS tool. The coating reduces cutting forces, improves surface finish, and allows for higher cutting speeds.
Broaching is famous for producing excellent surface finishes (Ra 0.8 - 1.6). However, sometimes things go wrong. If your workpiece is tearing, chattering, or showing rings, it is unacceptable for precision parts. Here is a checklist to diagnose and fix the issue:
The most common cause of poor finish is misalignment. If the tool is not perfectly perpendicular to the faceplate, or if the pull head is not concentric with the workpiece holder, the tool will be forced against the side of the hole. This causes "Drift" and scraping/tearing on one side of the profile.
A sharp tool shears the metal cleanly. A dull tool behaves like a plow, pushing material instead of cutting it. This causes immense heat and tearing. Inspect the cutting edge under magnification. If it's rounded, stop and sharpen.
Broaching is a slow-speed, high-pressure operation. Cooling is secondary; lubrication is primary.
This happens when workpiece material welds itself to the face of the tool tooth. It essentially changes the geometry of the cutter, leading to a rough finish.
Fix: Use a TiN coated tool (gold coating prevents sticking) or increase the cutting speed slightly to generate better chip flow.
Broaching is not just for holes. It is a versatile process divided into two main categories: Internal and Surface (External). Understanding the difference is key to selecting the right machine.
This is the most common type. The tool is pulled (or pushed) through a pre-drilled hole or opening to change its shape or size. The tool is completely surrounded by the workpiece.
In this method, the tool passes over the *outside* surface of the workpiece. It competes directly with milling machines but is much faster for high volumes.
Internal broaching forces are balanced (the tool centers itself). Surface broaching creates massive lateral (side) forces, trying to push the part away. Therefore, surface broaching requires extremely rigid fixtures and heavy-duty machine structures.
Broaching generates immense friction and heat at the cutting edge because the tooth is in continuous contact with the metal for a long duration. The choice of fluid can make or break your process.
These are pure oils, not mixed with water. They often contain EP (Extreme Pressure) additives like Sulfur, Chlorine, or Phosphorus.
These are oils mixed with water (emulsions), usually at 10-15% concentration.
For internal broaching of steels (splines, keyways), we almost always recommend Neat Cutting Oil. The cost of the oil is negligible compared to the cost of breaking an expensive broach tool.
Broaching is a robust process, but defects can occur. Identifying the root cause quickly saves time and money. Here are the "Big 4" defects:
Symptom: Material welds to the tooth face, causing a torn surface on the next part.
Cause: Poor lubrication or soft/gummy material.
Fix: Switch to high-sulfur oil. Use a TiN coated tool. Increase cutting speed slightly.
Symptom: Wavy ripple marks on the surface surface.
Cause: Fewer than 2 teeth in contact with the part at once (pitch too large), or loose fixture.
Fix: Check clamping rigidity. Reduce cutting speed. If problem persists, redesign tool with finer pitch (more teeth).
Symptom: The exit hole is not concentric with the entry hole. The wall thickness varies.
Cause: Tool is bent, machine misalignment, or faceplate is not square to the tool axis.
Fix: Check tool runout between centers. Use a self-aligning fixture.
Symptom: Deep scratches on the surface.
Cause: Dull tool or "Chip Packing" (gullets are full of chips and rubbing against the wall).
Fix: Sharpen the tool. If chips are packing, the tool needs larger gullets (redesign required) or better brush cleaning between strokes.